
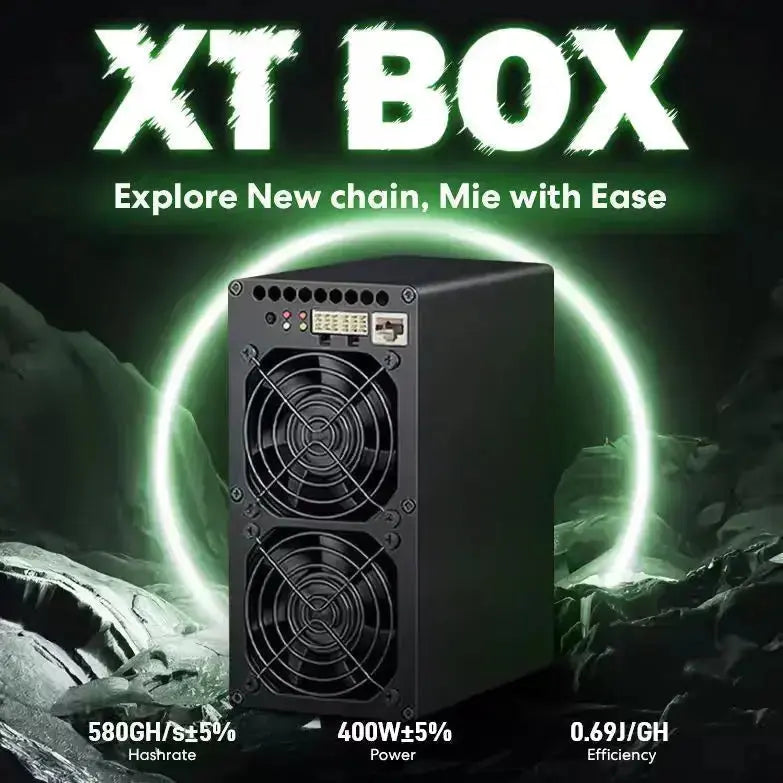
Goldshell XT BOX Miner Setup:
A Complete Beginner Guide
Unboxing · network discovery · dashboard login · pool configuration · monitoring and troubleshooting
On This Page
1Setup Overview
The Goldshell XT BOX miner is designed to be easier to deploy than a full-size industrial ASIC, but it still needs a disciplined setup process. The goal is simple: connect the miner safely, find it on your local network, enter the web dashboard, configure a pool, then watch the first hours of performance before treating it as stable.
This guide rewrites the original setup instructions into a cleaner step-by-step workflow. It is intended for home miners, first-time ASIC users, and small operators who want a practical checklist rather than a scattered setup note. The XT BOX should be treated as real mining hardware: small, but still sensitive to airflow, power quality, network stability, and pool configuration.
Power and network first, dashboard second, pool settings third, monitoring last. Do not skip the monitoring stage just because the miner begins hashing.
2Before You Start
Prepare the setup area before plugging in the miner. Choose a stable table, shelf, or open rack location with clean airflow. Avoid enclosed cabinets, carpeted corners, and dusty surfaces. Compact miners can feel forgiving, but heat still accumulates when the exhaust path is blocked.
You will need the miner, a compatible power supply, an Ethernet cable if using wired setup, a router or switch on the same local network as your computer, and a browser. Keep your mining pool account details ready: pool URL, worker name, and password. Most pool passwords are simple placeholders, but each pool formats workers differently, so check your pool dashboard before entering the details.
- Confirm the power supply matches the miner's requirements.
- Use a reliable wall outlet or power strip with proper rating.
- Keep the intake and exhaust sides open.
- Use the same local network for your computer and miner.
- Prepare pool URL, worker name, and worker password before login.

3Connect Hardware Correctly
Start with the miner powered off. Connect the Ethernet cable to your router or switch, then connect the power supply to the miner. After power is applied, allow the device a few minutes to boot. Fans may ramp up briefly during startup, and indicator lights may change while the system initializes.
Do not place the miner directly against a wall or another device. Give the exhaust side enough space to move hot air away from the unit. If the miner is in a warm room, use a small external fan or reposition it before troubleshooting performance. Many early mining issues come from basic heat or airflow problems, not from pool configuration.
4Find the Miner on Your Network
Once the XT BOX has booted, open a browser on a computer connected to the same local network. Goldshell's official network discovery tool, find.goldshell.com, is commonly used to locate BOX-series miners. The tool helps identify the miner's local IP address so you can open the device dashboard.
If the tool does not find the miner immediately, wait a little longer and refresh. Confirm the Ethernet cable is seated, check that your computer and miner are on the same router, and look inside the router's connected-device list. Some home networks isolate Wi-Fi clients from wired devices, which can make discovery harder even when both devices are online.
If discovery fails, do not keep changing pool settings blindly. First confirm the miner has a local IP address and that your computer can reach that IP in a browser.
5Open the Dashboard and Login
After finding the miner IP address, enter it into your browser. The Goldshell dashboard should load. From there, review the device status, network information, fan behavior, temperature readings, firmware version, and mining configuration page. If the page does not load, confirm you are using the correct IP address and that the miner is still powered on.
For a new setup, change default credentials if the dashboard allows it, especially if the miner is on a shared or business network. Keep the dashboard accessible only on your local network unless you know exactly what you are doing. Remote exposure of miner dashboards can create avoidable security risk.
6Configure Pool and Worker Settings
Pool configuration is the step where most beginners make mistakes. Enter the pool URL exactly as provided by your mining pool. Then enter the worker name in the format expected by the pool, usually account name plus worker name. The password field is often a simple value such as x, but you should follow your pool's instructions.
Save the configuration and allow the miner several minutes to connect. A healthy setup should begin showing pool connection status, accepted shares, hashrate movement, fan speed, and temperature readings. Hashrate does not always stabilize instantly, so evaluate performance over time rather than from the first minute.
- Copy the pool URL exactly, including port number.
- Use the worker format required by your pool.
- Save settings and give the miner time to reconnect.
- Watch accepted shares, not only displayed hashrate.
- Keep a backup pool entry if your dashboard supports it.
7Video Guide
Use the video below alongside the written checklist if you prefer to watch the setup flow before configuring the miner yourself.
Video guide: watch the XT BOX setup flow, then use the written steps below to confirm power, network discovery, dashboard access, pool configuration, and accepted shares.
Open video on YouTube8Monitor the First 24 Hours
After the XT BOX starts mining, do not walk away permanently. The first day is for stability checks. Watch temperature, fan speed, rejected shares, connection drops, and pool-side hashrate. If the dashboard reports abnormal temperature or the miner repeatedly disconnects, fix the environment before assuming the hardware is defective.
Keep the miner away from moisture, thick dust, and closed spaces. If you move it to another room, restart monitoring because ambient temperature and network quality can change. A compact miner can run smoothly for long periods, but only when the basics stay consistent.
Confirm stable pool connection, accepted shares, reasonable temperature, steady fan behavior, and no repeated reboot loop before calling the setup complete.
9FAQ
Why can't I find my Goldshell XT BOX on the network?
Confirm the miner has finished booting, the Ethernet cable is connected, and your computer is on the same local network. If needed, check your router's connected-device list.
Do I need Ethernet for setup?
Ethernet is usually the easiest first setup path because it simplifies discovery. After the miner is reachable, follow official Goldshell guidance for any supported Wi-Fi configuration.
Why is my miner connected but not earning shares?
Check the pool URL, port, worker name, and password format. Also confirm the pool supports the miner's algorithm and that your account dashboard shows the worker online.
Can I run the XT BOX in a bedroom or office?
Possibly, but consider noise, heat, airflow, and electrical safety. Place it on a stable surface with open airflow and monitor temperature during the first day.
10References and Data Sources
- Goldshell BOX Series TutorialOfficial Goldshell support article for BOX-series setup, network discovery, dashboard access, and Wi-Fi guidance.
- Goldshell Miner Discovery ToolOfficial tool commonly used to find a Goldshell miner's local IP address on the network.
- Goldshell Support CenterOfficial support entry point for product documentation, tutorials, and troubleshooting resources.
- Goldshell XT BOX Setup VideoVideo reference used for the setup walkthrough section embedded above.
- Bitcoin Developer Reference: getmininginfoTechnical reference useful for understanding mining status concepts such as hashrate and network mining data.
Final Verdict
Setting up a Goldshell XT BOX is straightforward when you follow the right order: connect hardware safely, find the miner IP, open the dashboard, enter pool settings, then monitor stability.
The most common setup failures are not complicated. They usually come from network discovery, pool formatting, blocked airflow, or checking performance too soon after startup.




Leave a comment
This site is protected by hCaptcha and the hCaptcha Privacy Policy and Terms of Service apply.